The Rubber Cafe has a great tutorial on reuse of aluminum cans for metal embossed embellishments on a card.
Here is the card created by Karen Thede, one of the design team members at The Rubber Cafe:
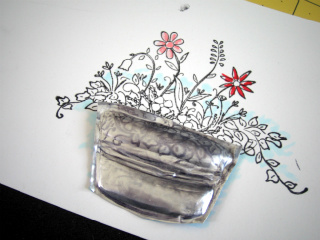
This card is features The Rubber Cafe’s Hand-Picked Floral stamp.
Karen Thede created this tutorial:
To create this I stamped and embossed on aluminum giving a fun metal pail to hold my flowers.
Read on, I have created a tutuorial to show you this fun technique on how to stamp and dry emboss on metal.
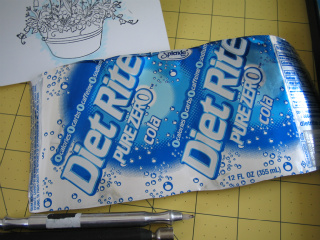
Here we go! You’ll need 1 empty aluminum soda can to get started.. that’s right, I started with a clean soda can, mine was Diet Rite, but any drink will do.
To prep my aluminum can, I took my kitchen sheers, and carefully cut the top and bottom off. Then I cut up one side giving you a rectangular piece to work with.
Safety tip! 🙂 I use garden gloves when I’m handling this as it can get ragged while your cutting the tops and bottoms off. I then trim it so it’s smooth. Now if you’re careful you can handle safely w/o the gloves.
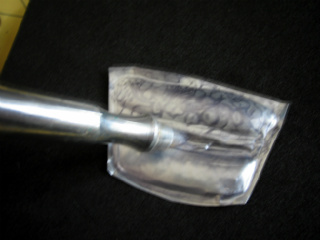
The tools I’m using are metal stylus with nylon tips that work smoothly on the metal for adding texture and interest. I worked with a pointed tip to outline and a round ball tip for the inside. This will become clear as we get going.
Now that my can has been prepared I am ready to stamp my image. I used Archival black ink but you can also use Staz-on. Since this is a smooth surface you need an ink that will set well on the aluminum. You will stamp your image on the inside or plain part of the can. Or which ever side you want to have exposed as the right side in your finished projects. (sometimes it’s fun to have the print and color of the can as your right side.)
Taking your pointed tip tool start by outlining the outside lines of the stamped image. I usually work just to the outside of the stamped line. You’re working from the front now, and with your tool trace around the image. I also defined the center lines, as these will also become important to the finished results.
Once you’re done with that, flip the image over, and you should be able to see the embossed lines you’ve just drawn.
Here you can see my aluminum piece flipped over. Since the top of the pail is covered by the floral arrangement, for now I’ve just drawn in my own top edge this will help me later when I do the inside.
This picture also gives you a good look at the tools I’m using.
Now working from the back – I”m using the round ball tip, to work the 2 inside sections. Using a circular motion, I’m working the metal out so it will give me some more dimension and depth.
In addition to the round tip tool, I’m also working on a soft foam sheet. Mine came with my tools- but you can also use a foam mouse pad, or craft foam sheet. Also a magazine would do the trick. You want to have some give so it will give you a smooth look and easily allow for the embossing to happen. On a hard surface it pushes back at you and creates harsh edges.
See in the picture below, I’m working on my black foam mat, and I’ve used the round tip to deboss the upper portion of my pail.
Now I’m ready to flip it over, and using my pointed tip again, I work it around the outline I created before. This time you’re right on the stamped line. It will redefine the parameters of your image, and give it the extra detail you need. Also, if your shape has become a bit rolled or warped, this will shape it back up again.
Once you have the embossing and texture you want, you’re ready to trim your image.
Here you can see I just cut it around the outside line of the pail. And for placement purposes you can lay it on your stamped image to see how it’s going to fit.
I will not be adhering this securely until I have finished all my coloring. This will go on last.
The card itself is pretty simple, I used my Spellbinder Circle dies, to cut out the floral arrangement and backed it in Red. While it was still in the die, I sponged Broken China distress Ink throughout the background. Another slightly larger circle cut in red card stock gave it just enough pop against the Kraft Card base.
Because my image had floral and leaves hanging over it – I stamped that area again, fussy cut it out and layered that on over my pail.
Below is another close up, to finish my card, I tied more gingham ribbon around the lower edge and with some Scrapper’s floss, tied on a little garden tool that I had in my stash. I love that it too was metal and thought it a perfect finish to my garden pail of beautiful flowers!
That’s it! I love this technique in a very literal way – a metal container should be made out of metal right? But this technique is really neat with flowers or any other outlined stamped images where you want to add interest and texture. I left my metal alone, but it’s a great medium to apply, alcohol inks, paint or even embossing powders.
Thanks so much and enjoy the weekend.
Supplies:
Ink: Memento Tuxedo Black, Copic markers
Embellsihments: Gingham wired edge ribbon, Garden tool charm, Natural Scrapper’s Floss