How adorable to send out a flower pot full of Poinsettias to your family and friends at Christmas. For many years now I have made my own Christmas cards. I always enjoy sending out something that is creative, different, and adds a touch of love. When I found this amazing card made by Karli Miranda at http://craftingwithclass.blogspot.com, I was so excited to get busy and create my Poinsettia cards.

Adding an insert with your Christmas message, or sentiment will personalize the card.

The Flower Pot Pocket Card was created by Stephanie Luman. You can also go to her website at: http://www.splitcoaststampers.com/resources/tutorials/flowerpotpocket/ for more ideas on different cards using the flower pot and flower instructions.
Supplies for Flower Pot Card with Poinsettias
- One 9” x 3 ½” piece of cardstock – flower pot
- One 2 ¼” x 4 ¼” piece of cardstock – pocket insert
- One 2 ½” x 4 ½” piece of cardstock – pocket insert mat
- One 3” x 3 ½” piece of patterned paper or embossed cardstock – flower pot front
- Two 2 ½” x 2 ½” pieces of cardstock – leaves (shown in Old Olive)
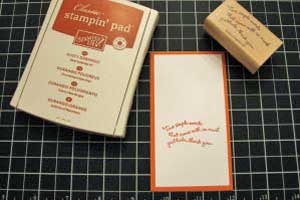
- Stamp or write personal message
- Ink (shown in Dusty Durango)
- Portable Paper Cutter (Fiskars 12” Deluxe Portable Paper Trimmer shown here
- Adhesive
- I used gold cardstock to look like the gold wrap on the real poinsettias I saw. I used the MS embossed zig zag border punch along the edge. The Poinsettias are the Layered Poinsettias dies from Heartfelt Creations.
- Ribbon
Instructions:
Step 1
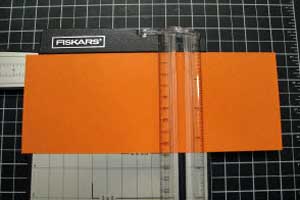
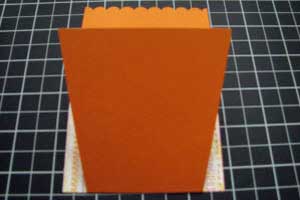
Score 9” x 3 ½” piece of cardstock in landscape position at 2” and 5 ½”.
Step 2
Fold the 2” score line in a mountain fold and the 5 ½” score line in a valley fold.

Step 3
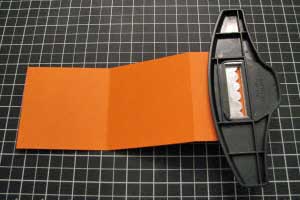
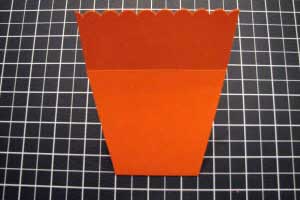
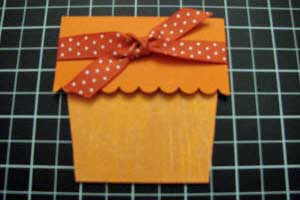
Punch the edge of the 2” front flap with the Scallop Edge Punch.
Step 4
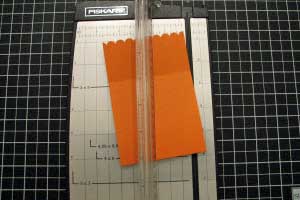
To create the flower pot shape, place the cardstock in the paper trimmer with the top 2” flap flipped up and the bottom flap folded behind. Line up the 2” score line with the cutting track and the 5 ½” fold line with the ½” mark on the trimmer. Place the cutting guide over the card and cut. Turn cardstock and repeat.
Step 5
Adhere the 3” x 3 ½” piece of patterned paper to the bottom front of the flower pot. Flip the flower pot over and trim away the excess patterned paper from each side.
Step 6
Tie ribbon around the top part of the flower pot to hold the pot together, no adhesive needed. Attach a tag to the ribbon if desired.
Adhere the 2 ¼” x 4 ¼” piece of cardstock to the 2 ½” x 4 ½” piece of cardstock. This will be the insert piece with the poinsettias attached at the top. Stamp your sentiment on the lower portion.
Thanks for directions. Beautiful card!
Pingback: URL
Pingback: Sequin Art Kits